
Checkpoints are specific physical locations marked with a QR code that can be scanned using the Vismo Locate & Protect app. These are typically placed at key areas such as building entrances and exits, high-risk zones, laboratories, or secure rooms. Scanning a Checkpoint allows users to log their presence at a location, helping to improve visibility, safety, and compliance across an organisation.
To create a new Checkpoint or Point of Interest within your Vismo account, follow the steps below:
Step-by-Step Instructions
- Go to Account Settings
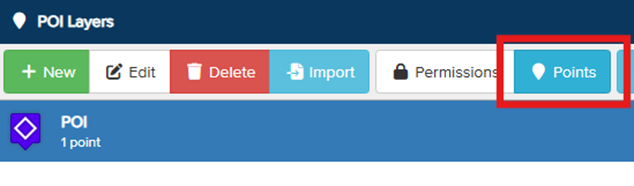
Navigate to Account Settings > POI Layers. - Select the Relevant POI Layer
Choose the POI layer you want to work with.
Then, click ‘Points’ in the toolbar at the top of the screen.
This will display all POIs within the selected layer.
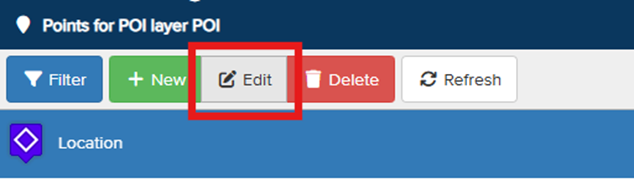
- Choose a POI to Edit
Find the POI you want to add a Checkpoint to and click ‘Edit’ in the toolbar.
Open the Checkpoints Tab
In the edit screen, you can update the POI details.
To add a Checkpoint, click on the ‘Checkpoints’ tab in the toolbar.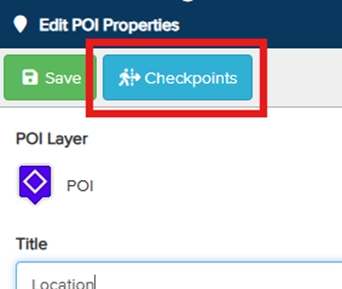
Create a New Checkpoint
Click ‘New’ to begin creating your Checkpoint.
- Enter Checkpoint Details
- Name the Checkpoint (e.g. "Main Entrance", "Lab 2", "Security Gate").
- Select the Checkpoint Type from the drop-down list:
- Entry/Exit
- Internal
- Add Tags (optional) to help describe or categorise the Checkpoint.
- Save the Checkpoint
Click ‘Save’ to create your new Checkpoint. - Confirm the Checkpoint Has Been Added
Your new Checkpoint will now appear under the selected POI. - Download the QR Code
- Highlight the newly created Checkpoint.
- Click ‘QR Code’ in the toolbar.
- The QR Code will be displayed, with the option to download it as a .png file.
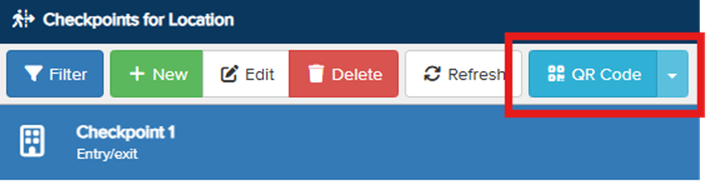
Use the drop-down menu beside ‘QR Code’ to select alternative download formats, if needed.
- Print and Place the QR Code
Once downloaded, print the QR Code and place it at the designated Entry/Exit or Internal location for users to scan with the Vismo Locate & Protect app.