Checkpoints are specific physical locations marked with a QR code that can be scanned using the Vismo Locate & Protect app. Whenever a user scans a Checkpoint using the Vismo Locate & Protect app, the data is recorded and viewable through the Vismo Portal. You can access both real-time and historical scan information.
Follow the steps below to locate and view these reports.
Step-by-Step Instructions
- Access the Vismo Portal
Open the Vismo Portal in your browser or access the Portal through the Vismo Monitor app. - Go to the POI Section
From the left-hand side menu, click on the POI (Point of Interest) icon. - Select the POI Layer
Choose the POI layer that contains the location and Checkpoint you want to view. - Highlight the POI Location
Click on the POI so that it is highlighted on the map view on the right-hand side. Open the Actions Menu
A panel will appear at the bottom of the screen displaying details for the selected POI.Click the ‘Actions’ menu within this panel.
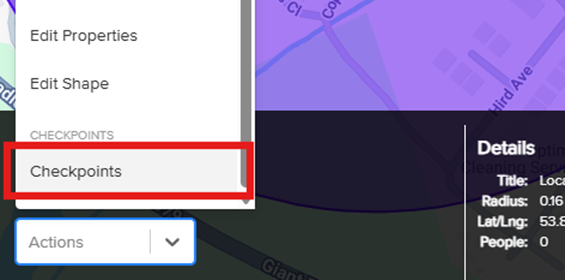
- View Checkpoint Data
In the Actions menu, select ‘Checkpoints’.
This will open the Checkpoint Reports section for that location. - View Current and Historical Checkpoint Reports
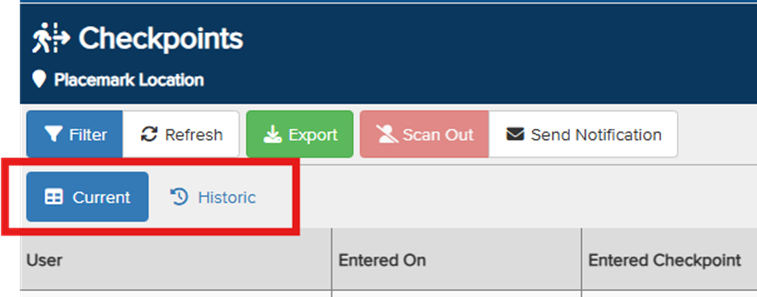
The report is split into two tabs: Current and Historic.
Current
This tab shows users who are currently scanned in to a location.
- Use the toolbar at the top to filter by:
- Date and time
- User name
- Checkpoint name
- Click ‘Export’ to download the data as a CSV file for use elsewhere.
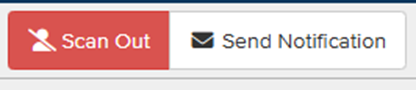
As an administrator, you can:
- Highlight a user and click ‘Scan Out’ to manually sign them out of the location.
- Send a notification to users currently scanned into a specific location.
Historic
This tab shows historical data of users scanning in and out of Checkpoints.
- Use the toolbar at the top to filter by:
- Date and time
- User name
- Checkpoint name
You can also export this data as a CSV file for reporting or analysis.