
To invite multiple users—whether new or existing—to the Vismo portal, it can be quicker to import them in bulk and send invitations using this method. Follow the steps below:
1. Click on the Services icon at the top right corner of the screen, then select Jobs from the list.
2. A new page will appear. Click on New, then select User Import.
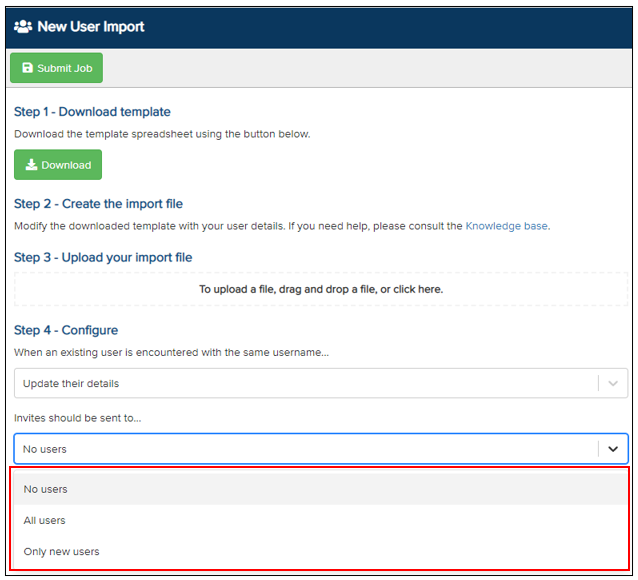
3. Follow the on-screen instructions to bulk import users into the Vismo Secure Portal.
4. Under Invites should be sent to…, select the desired action from the dropdown menu.
5. The status of your upload will be displayed once it is complete, and each user will be assigned to their respective groups.
Key Points to Consider When Bulk Importing Users
General
This spreadsheet can be used to bulk import or update multiple users in Vismo and automatically add them to groups. Some columns are mandatory, while others are optional. Refer to the details for each column below.
- Do not leave blank rows within the spreadsheet. If the import encounters an entirely blank row, the process will stop at that point.
- Do not delete entire columns. If a value is not required for a column, leave the cell empty.
- The import process starts from row 3. Leave the first two rows as provided.
- Use this column to specify the user’s email address.
- Email addresses are optional.
- Maximum length: 255 characters.
Username
- Use this column to specify the username, which uniquely identifies the user within Vismo.
- A username is required.
- Maximum length: 100 characters.
Forename
- Use this column to specify the user’s forename.
- A forename is required.
- Maximum length: 50 characters.
Surname
- Use this column to specify the user’s surname.
- A surname is optional.
- Maximum length: 50 characters.
Password
- Use this column to specify the user’s password.
- A password is required and must meet the minimum password requirements set for the account.
Calling Code
- Use this column to specify the telephone calling code associated with the user.
- The calling code defines the country of the telephone number. For example, the UK uses 44.
- A calling code is only required if the user has a telephone number. Leave it empty if the Telephone Number cell is blank.
Phone
- Use this column to specify the user’s telephone number.
- A phone number is optional.
- If provided, enter only the local portion of the number. For example, for 447712345678, enter 7712345678.
- Maximum length: 50 characters.
Groups
- Use this column to specify the groups to which the user should be added. Groups help categorise users for permissions, events, and other settings in Vismo.
- Multiple groups can be listed, separated by a semicolon (e.g., Group 1;Group 2).
- To add users to a subgroup, use the pipe symbol (e.g., Parent Group|Child Group).
Failed Imports
If an upload has failed, click on the corresponding line until it is highlighted in blue, then click the Details button.
The reason for the failure will be displayed.
Review your upload spreadsheet and correct any errors. Then re-upload the corrected spreadsheet, and the successful upload will be displayed.