
This guide explains how to set up who or what can trigger a workflow, how to tell each action where to get its information, and how the workflow designer checks your workflow and warns you before you publish it or remove something other actions rely on.
The workflow designer asks plain questions and catches more mistakes before a workflow is published. Inputs are simpler to configure, and problems are highlighted on the exact action and field that needs fixing, rather than only being listed in the validation panel.
Before you start
- You need permission to create and edit workflows in the Vismo Portal.
- Workflows that are already published continue to run as before.
- Choices that can't be used are greyed out, with the reason shown.
- Where only one choice is possible, it is picked automatically.
- Once saved, the Inputs tab describes each source in words, so you can see at a glance where each action gets its information.
- Optional settings are listed under Advanced inputs. These don't need to be set; only set them if you need something different.
- An action can only use results from an action that always runs before it.
- Information must be the right kind, for example a list of people.
- Other inputs, such as a note, can sit alongside a person or an area.
- Input names are created automatically, and new inputs are required by default.
- Published workflows run as before.
- Existing workflows open on the matching answer. Workflows with other inputs ask the trigger question once.
- Templates open ready to use.
Choosing who or what can trigger a workflow
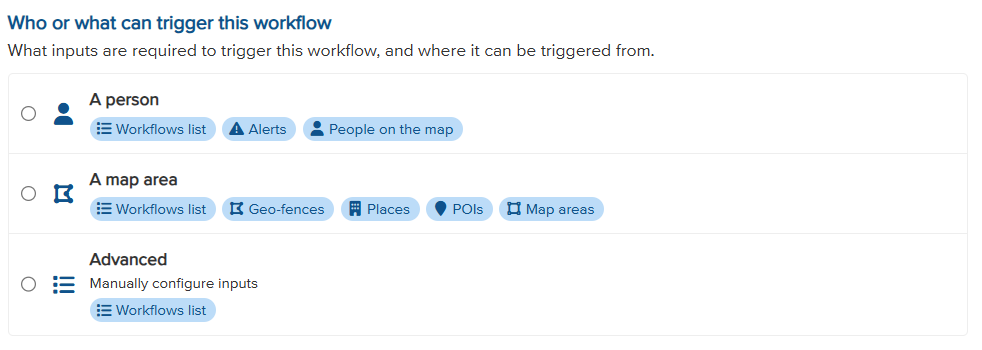
The Details tab asks one question, Who or what can trigger this workflow, and sets up the workflow's inputs from your answer.
|
Step |
What to do |
|
1 |
Open the workflow designer, Account Settings > Workflows, and create a new workflow or open an existing one. |
|
2 |
Select the Details tab. |
|
3 |
Under Who or what can trigger this workflow, choose A person, A map area or Advanced (see the table below). |
|
4 |
Save the workflow. |
|
Answer |
What the designer sets up |
Where the workflow can be started from |
|
A person |
A required Person input |
Workflows list, Alerts, and People on the map |
|
A map area |
A required Area input |
Workflows list, Geo-fences, Places, POIs, and Map areas |
|
Advanced |
Nothing; you add the inputs yourself |
Depends on the inputs added |
Telling each action where to get its information
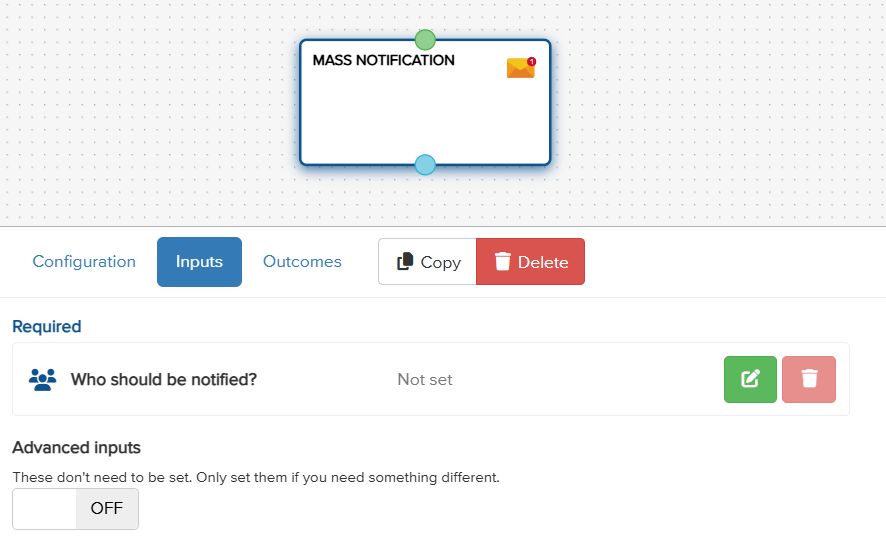
Each action asks its own question in plain words, for example "Who should be notified?" for a Mass notification action. The possible answers are grouped by where the information comes from: provided by the workflow, from an earlier action, or fixed text.
|
Step |
What to do |
|
1 |
Select the action in your workflow and open its Inputs tab. |
|
2 |
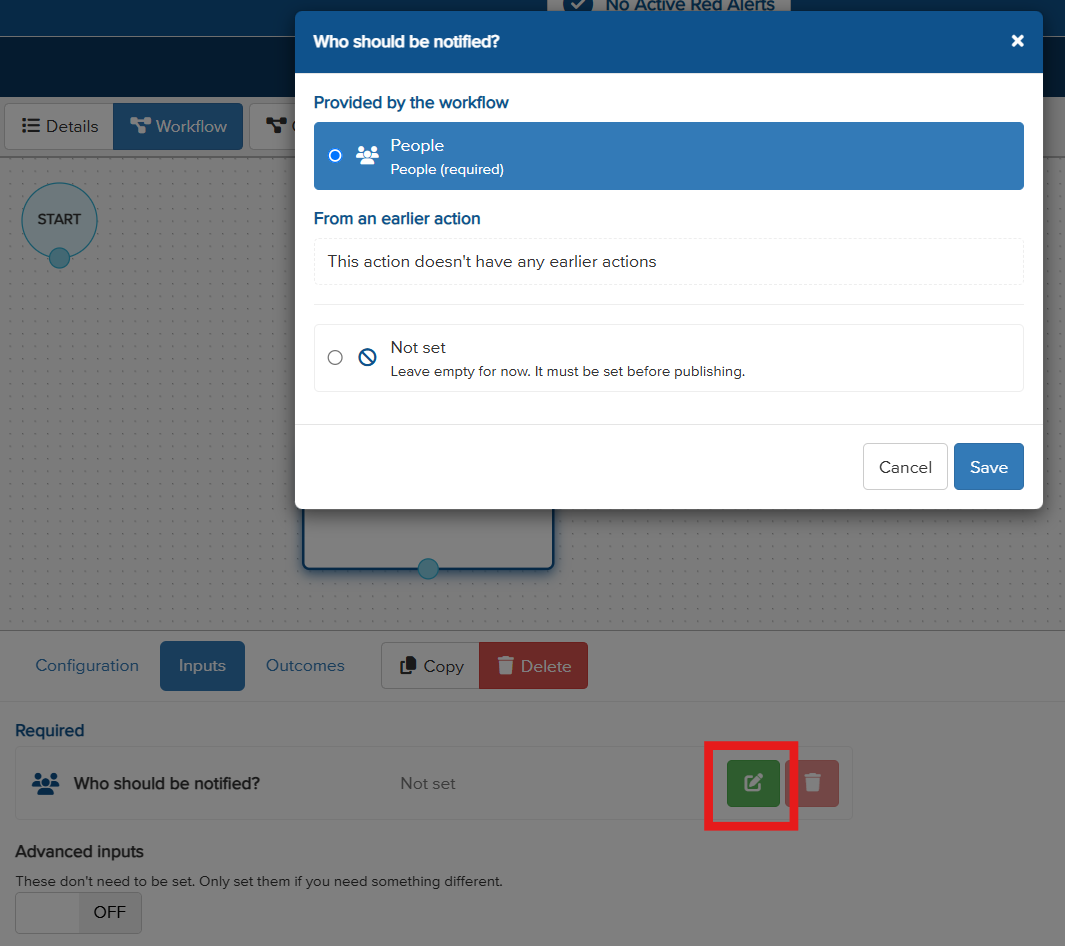
Under Required, find the question you want to answer (for example, Who should be notified?) and select the edit button next to it. |
|
3 |
In the dialog, choose where the information should come from: an input Provided by the workflow, a result From an earlier action, or fixed text. You can also choose Not set to leave it empty for now, but it must be set before the workflow is published. |
|
4 |
If the workflow does not yet have the input you need, create it from the dialog in one click (for example, Create a People input). |
|
5 |
Select Save. |
Checking your workflow before it's published
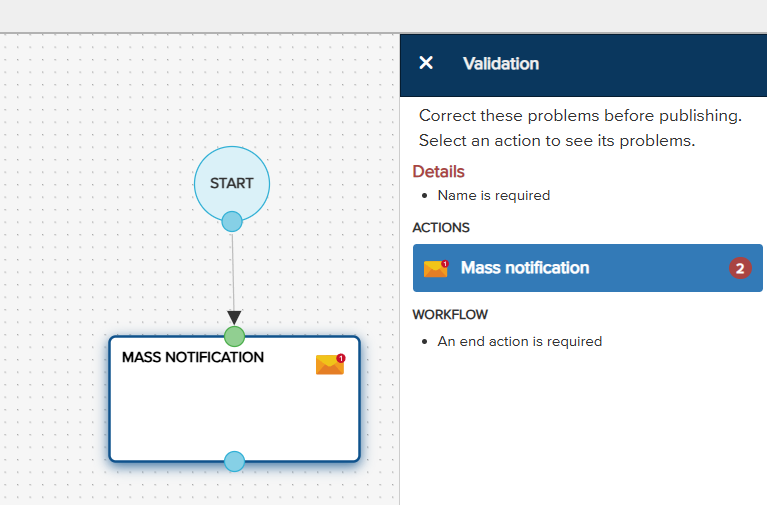
Problems are now shown on the action and field they relate to. The validation panel lists each action that has problems, with a problem count. Within the action, each tab (such as Configuration, Inputs and Outcomes) shows its own count, and an empty required input is flagged "This is required".
|
Step |
What to do |
|
1 |
Open the validation panel to see the actions that need attention. Click Validate in the toolbar. |
|
2 |
Select an action in the validation panel. It opens on the tab with the first problem. |
|
3 |
Fix the highlighted field. Fixing a field clears only that field's problem. |
|
4 |
Repeat for each action until no problems remain, then publish the workflow. |
The designer also runs two new checks:
- An action can only use results from an action that always runs before it.
- Information must be the right kind, for example a list of people.
Warnings before you remove or change something
The designer warns you before a change that would leave other actions without the information they rely on.
|
Change |
What happens |
|
Removing a workflow input |
The actions using it are listed, then cleared. |
|
Deleting an action whose results are used |
The actions using its results are listed, then cleared. |
|
Changing who or what triggers the workflow |
The actions using the current person or area are listed, then cleared. |
|
Making a used input optional |
A warning names the actions that need it. |
If you change your mind, Undo restores anything cleared since the last save.
Good to know
- Other inputs, such as a note, can sit alongside a person or an area.
- Input names are created automatically, and new inputs are required by default.
- Published workflows run as before.
- Existing workflows open on the matching answer. Workflows with other inputs ask the trigger question once.
- Templates open ready to use.
Troubleshooting / FAQs
Why is one of the choices greyed out? Choices that can't be used are greyed out, and the reason is shown next to them. For example, an action can only use results from an action that always runs before it, and the information must be the right kind.
Some of my actions were cleared after I made a change. How do I get them back? When you remove an input, delete an action whose results are used, or change who or what triggers the workflow, the designer lists the affected actions and then clears them. Use Undo to restore anything cleared since the last save.
Do I need to change my existing workflows? No. Published workflows run as before. Existing workflows open on the matching answer to the trigger question, and those with other inputs ask the question once.
Need more help? Contact Vismo Support at techsupport@vismo.com.